

Pipeline Configuration #
This document first shows how to create a pipeline, step by step. It then describes the configuration in two sections: Basic Information, which holds the core properties and execution behaviour, and the Pipeline Workflow Builder, a visual interface for designing the end-to-end execution flow.
1. How to Create a Pipeline #
Follow these steps to create a pipeline for an application, from opening the Pipeline Overview page to running it.
Step 1: Open the Pipeline Overview page #
| Step | Action |
|---|---|
| 1 | Click Application in the left sidebar of BuildPiper. |
| 2 | Select the application from the application list. |
| 3 | Click Pipeline Overview to open the pipeline page, where you create a new pipeline. |
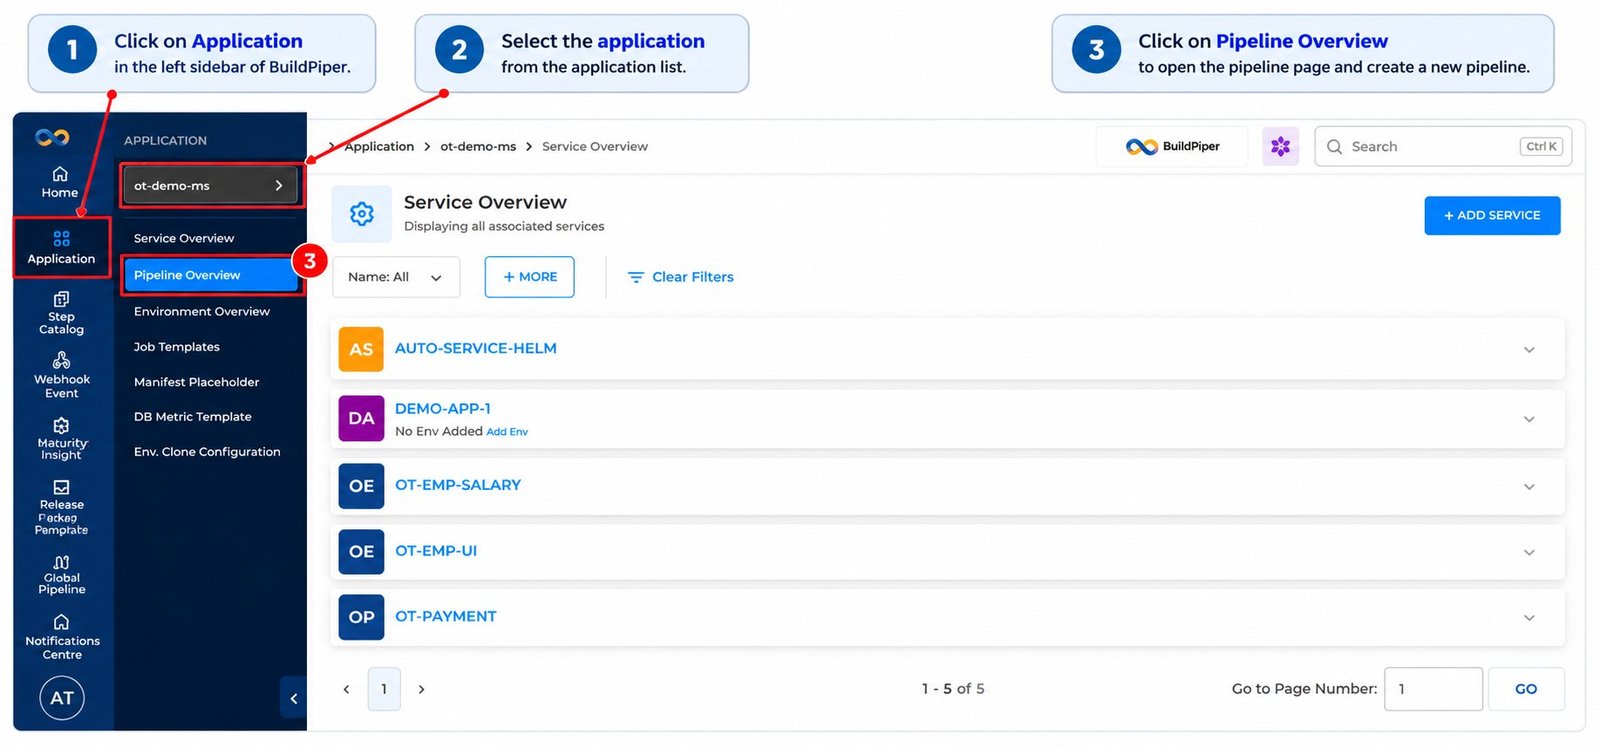
Figure 1: Navigating to Pipeline Overview
Step 2: Add a pipeline and fill in the details #
| Step | Action |
|---|---|
| 1 | On the Pipeline Overview page, click + Add Pipeline. |
| 2 | On the Setup Pipeline screen, fill in the pipeline details: name, version, retention count, execution option, trigger type, and the other settings. Each field is explained in Basic Information below. |
| 3 | Click Save & Continue. |
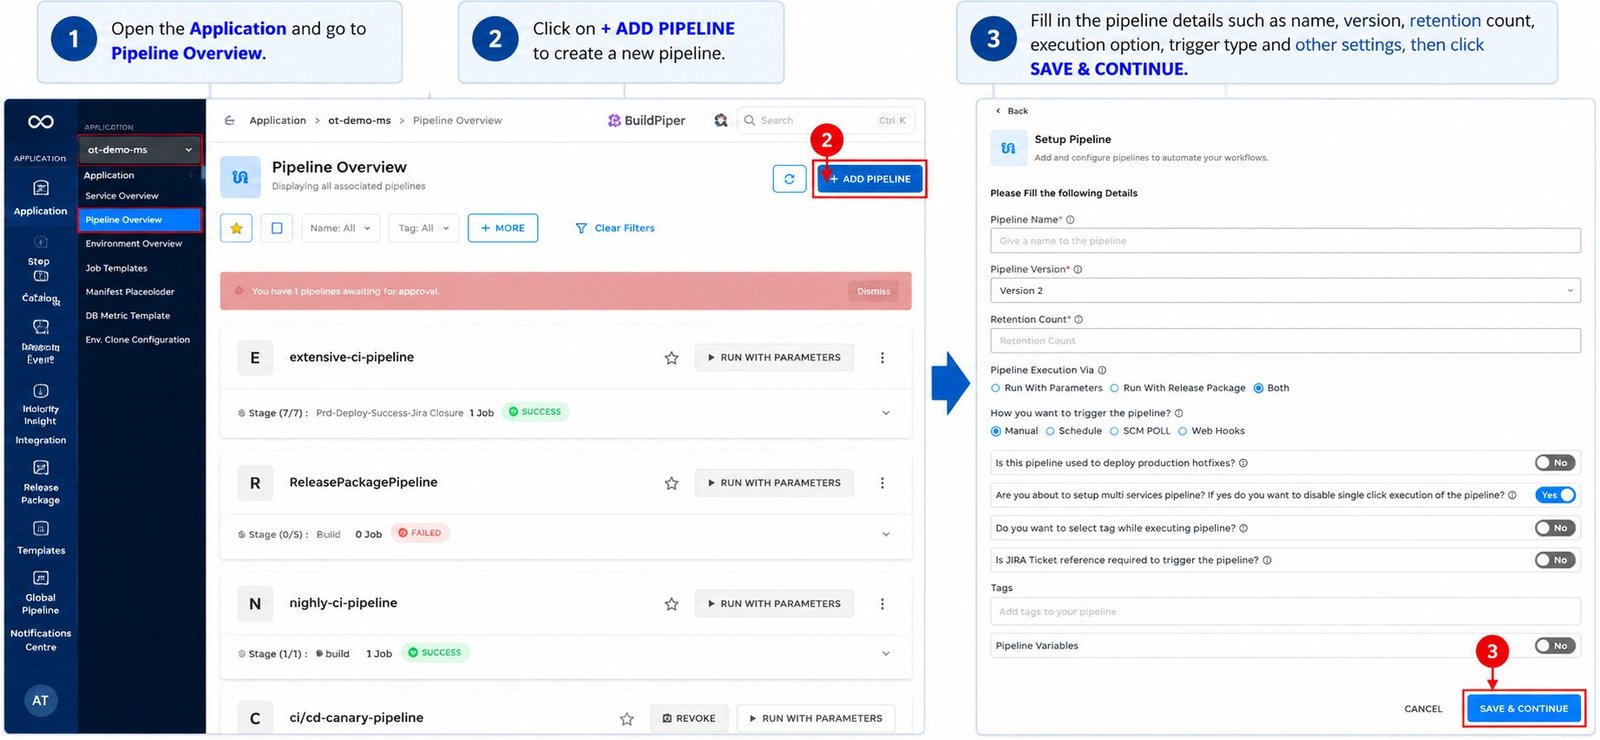
Figure 2: Add Pipeline and the Setup Pipeline screen
Step 3: Open the workflow builder #
After you click Save & Continue, the workflow builder opens with an empty canvas. The header shows the pipeline name, its trigger, and its retention count.
| Control | What it does |
|---|---|
| Edit Basic Info | Reopens the details you entered in Step 2. |
| Workflow / YAML | Switches between the visual builder and the YAML view. |
| Download / Upload icons | Export and import the pipeline as YAML. |
| Save Workflow | Saves the pipeline. |
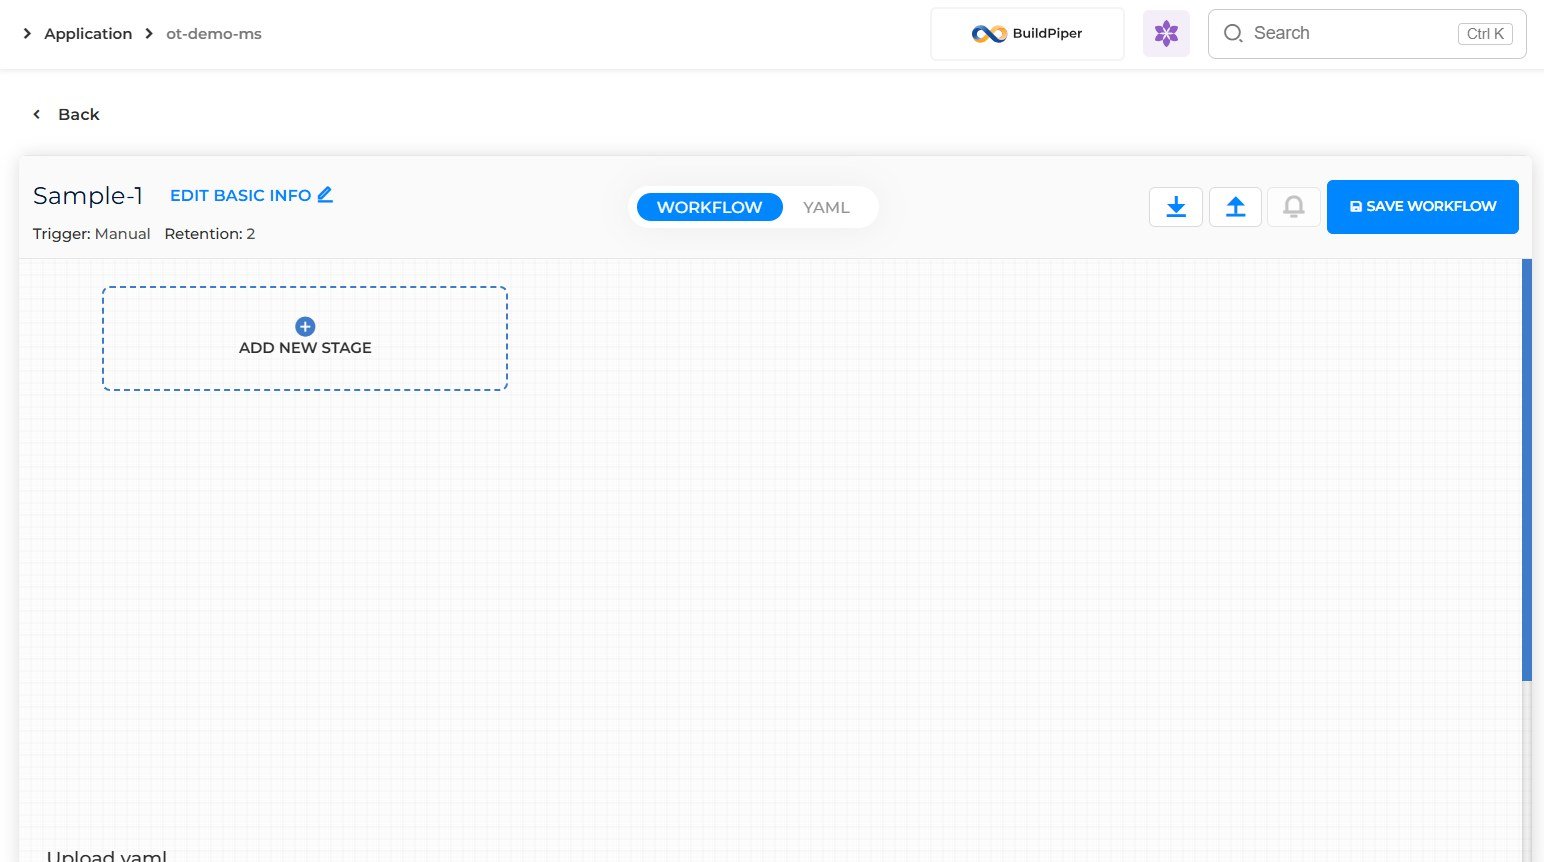
Figure 3: The workflow builder with an empty canvas
Step 4: Add stages and jobs #
Click Add New Stage, name the stage, and add the jobs it needs. Repeat for every stage, for example a Jira ticket stage followed by a Build & Deploy stage. The full steps, including conditions and approvals, are in the Stage Configuration document, section 1, Add Stages and Jobs.
Step 5: Save the workflow #
When all stages and jobs are in place, click Save Workflow.
Step 6: Run the pipeline #
After the workflow is saved, the pipeline you created is listed on the Pipeline Overview page, here Sample-1. Choose the pipeline you want to run and click Run with Parameters. The steps that follow are in the Pipeline Approval document, section 2, Run the Pipeline.
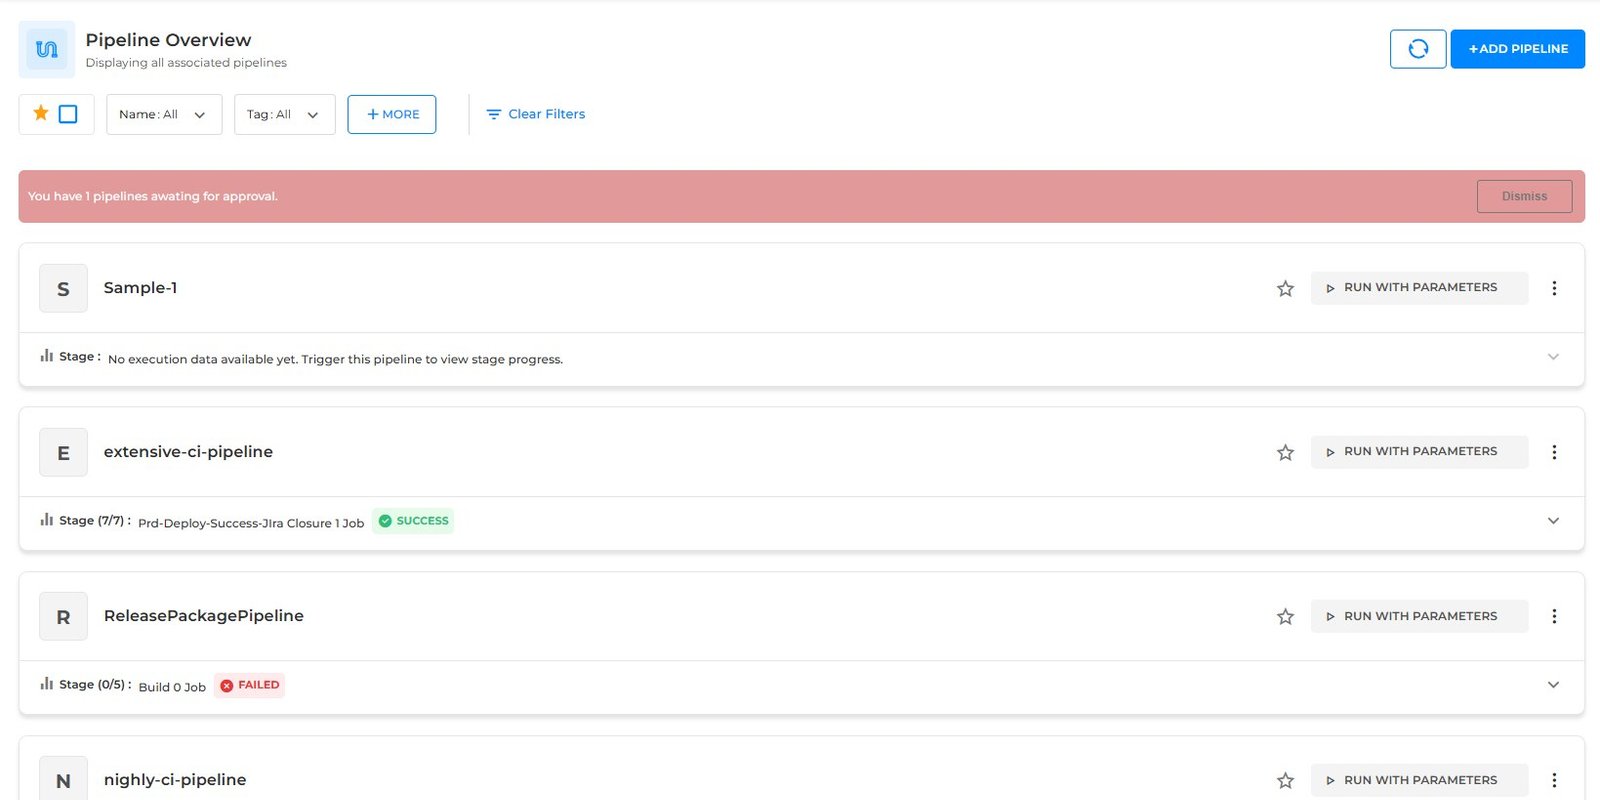
Figure 4: The new pipeline listed on the Pipeline Overview page, with Run with Parameters
2. Basic Information #
The Basic Information section defines how the pipeline is identified, triggered, executed, and managed within BuildPiper.
| Configuration | Mandatory | Description |
|---|---|---|
| Pipeline Name | Yes | The unique identifier assigned to the pipeline within the project. |
| Pipeline Version | Yes | The version of the pipeline configuration logic. See Pipeline Versions below. |
| Retention Count | Yes | The number of historical pipeline execution logs to be retained on the UI. |
| Pipeline Execution Via | No | Defines the trigger mode: Manual Parameters, Release Package, or Both. |
| Trigger Method | No | Sets how the pipeline can be triggered. See Trigger Methods below. |
| Production Hotfixes | No | A toggle to mark a pipeline intended for emergency production fixes. It is primarily a metadata field for auditing; these details are captured and shipped to Maturity Insights for production deployment hotfixes. |
| JIRA Ticket Required | No | If enabled, the user must provide a valid JIRA ticket before triggering. The ticket can be referenced in the pipeline to update details automatically or to pull details from JIRA for execution. |
| Disable Single Click Execution | No | BuildPiper supports triggering all services configured in the pipeline with a single click. This is disabled by default as a safety measure. When enabled, it allows simultaneous build and deployment of all services, so it should be kept disabled to avoid accidental builds and deployments. |
| Select Tag on Execution | No | Optional tag selection applied at the time of execution. |
| Pipeline Variables | No | Custom variables that can be referenced across the pipeline’s jobs and steps. |
2.1 Pipeline Versions #
| Version | Type | Description |
|---|---|---|
| V2 | Standard CI/CD | Ready-to-use CI/CD, auditing, and compliance workflow that enables quick pipeline creation. |
| V3 | Dynamic & Custom | A more dynamic way of creating pipelines. It enables dynamic jobs and dynamic workflows, and gives more control and freedom to create custom workflows and powerful automation. |
2.2 Trigger Methods #
| Method | Behaviour |
|---|---|
| Manual Trigger | The user must click the trigger button to start execution. |
| Scheduled Trigger | Triggers automatically based on a user-provided cron schedule. |
| Webhook Trigger | Triggers automatically on Git events such as commit, merge, or pull request. |
3. Pipeline Workflow Builder #
The Pipeline Workflow Builder provides a visual interface for designing and managing the execution flow of a pipeline. Each stage in the builder represents a logical unit of work and can contain one or more jobs that execute in sequence.
If a pipeline runs for more than one service, a job runs for all services in parallel, depending on the availability of executors.
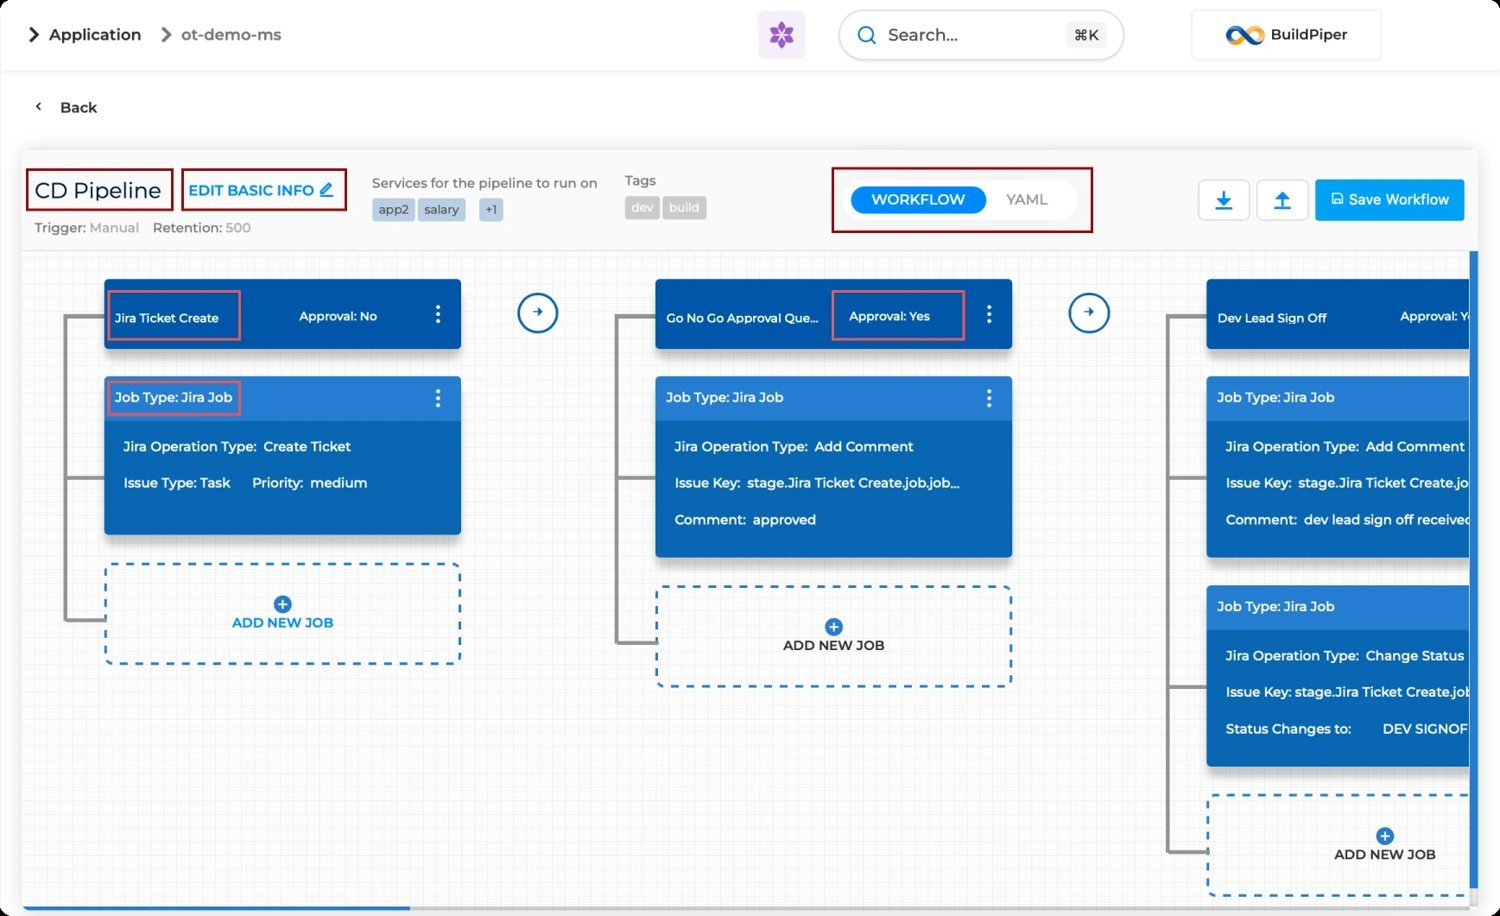
Figure 5: Workflow Builder showing the pipeline name, Edit Basic Info, Workflow / YAML toggle, stages with approval status, and jobs
3.1 Builder Canvas Capabilities #
Arrange stages and configure dependencies between them to define the end-to-end execution flow.
Set stage-level settings, approvals, notifications, and execution conditions.
Track job status, approvals, and stage outcomes through a visual representation of the pipeline.
Reuse delivery processes across teams and projects through standardised workflow templates.
Standard templates: BuildPiper provides a set of standard pipeline workflow patterns that organisations can adopt as-is. These cover build, deployment, approvals, change management, and release governance. Templates can be customised to align with internal processes, compliance requirements, approval chains, deployment gates, ticketing integrations, validation steps, and release controls.
4. Pipeline Creation Methods #
BuildPiper supports three ways to create and manage pipelines, so teams can choose the method that suits their workflow and automation needs.
4.1 Visual Pipeline Workflow Builder #
A drag-and-drop interface for creating pipelines visually. Users add stages and jobs from the component library, configure their settings, and define execution dependencies on the canvas. It is ideal for users who prefer a graphical experience and want to quickly design or modify pipeline workflows.
4.2 YAML-Based Pipeline Creation #
Pipelines can be defined using a BuildPiper-specific YAML specification. Users can export an existing pipeline configuration, maintain it in source control, and upload the YAML file to BuildPiper to create or update the pipeline automatically. This enables pipeline-as-code practices such as version control, peer reviews, and easier migration of pipeline configurations across environments.
Use the Workflow / YAML toggle on the builder to switch between the two views. The YAML view also provides sample YAML for the stage and for each job type.
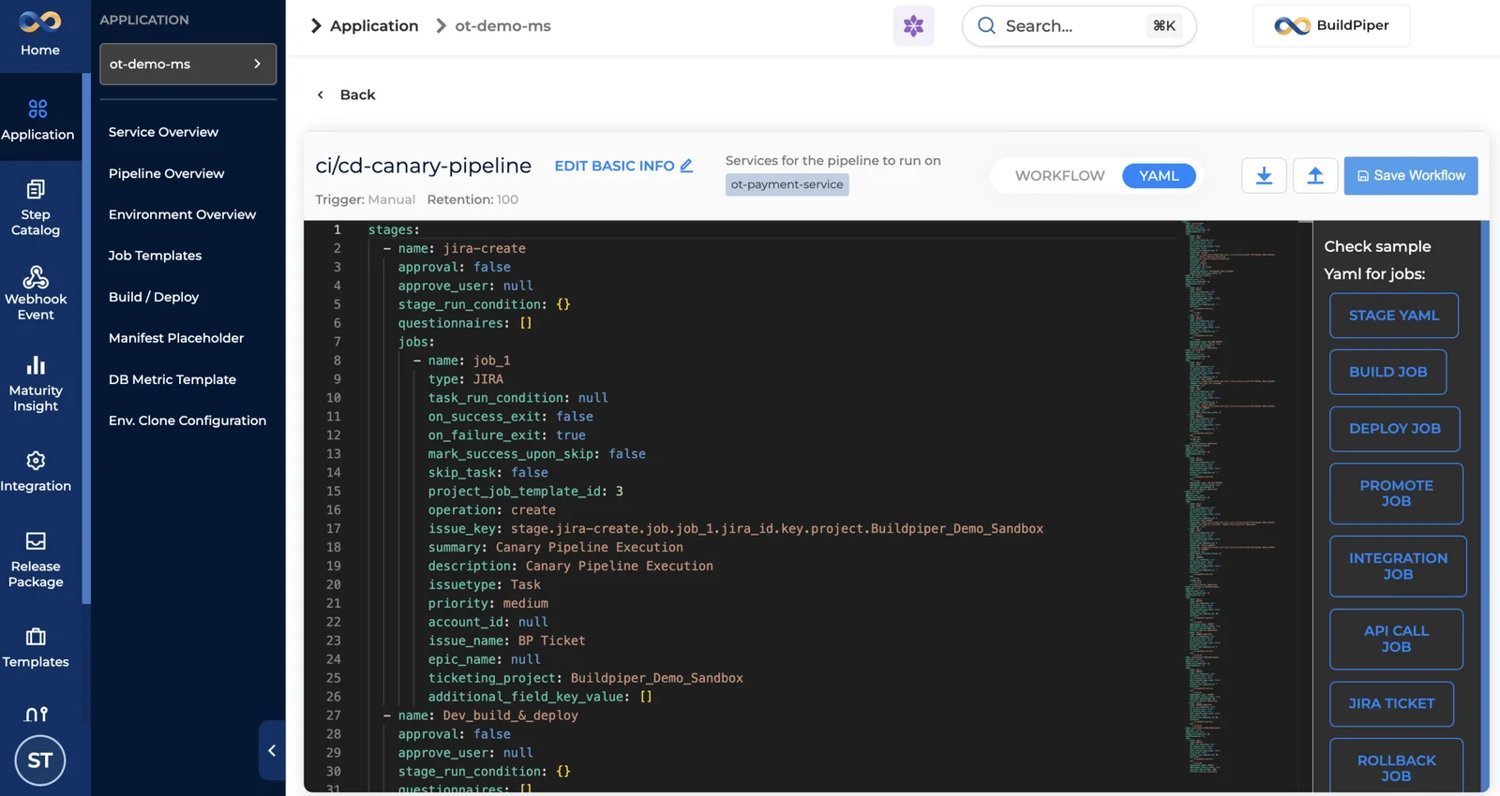
Figure 6: YAML view of a pipeline with sample YAML options for jobs
4.3 BPCTL – BuildPiper Command Line Utility #
BPCTL is BuildPiper’s command-line interface for creating, updating, managing, and automating pipeline configurations programmatically. It is particularly useful for bulk operations.
Read more: Stage Configuration > 1. Add Stages and Jobs
Job Definitions > 1. Job Types
Pipeline Approval > 2. Run the Pipeline