

Android Pipeline Definition #
A pipeline organizes jobs into stages, enabling the Android application build and Google Play deployment to run as a single workflow. This document explains how to configure a two-stage pipeline named native-build-deploy, with one stage for building the application and another for deploying it to the Google Play Store.
1. Pipeline Stages #
| Order | Stage | Android Jobs |
|---|---|---|
| 1 | build-att-app | Mobile Build |
| 2 | deploy-to-playstore | Deploy to Playstore (displayed as Android Deploy on the pipeline canvas) |
2. Create the Pipeline #
Navigation: Application → select the application → Pipeline Overview → Add Pipeline.
- 1
Click Add Pipeline and enter the pipeline details that your form requires.
- 2
Select a Manual trigger for the example workflow.
- 3
Add the build stage first and the deployment stage second.
- 4
Configure the stage jobs as described below, and then save the pipeline.
For more about pipeline fields and stages, see the Pipeline Configuration document.
Read more: Pipeline Configuration
3. Configure the Mobile Build Job #
- 1
Select Mobile Build as the Job Type.
- 2
Select From Environment.
- 3
Select the Android service under Services. The example uses dev-env and attendance-native-app.

Figure 1: Mobile Build job environment, service and template selection
Review the template that the pipeline job runs and confirm that it includes the required Android build or Play Store deployment steps. When needed, select an explicit mobile or Android template with the specific-template option. For a fixed service workflow, leave Dynamic jobs disabled.
Expected result: The first stage targets the correct Android service and environment and runs its configured mobile build workflow.
4. Configure the Deployment Stage #
In the second stage, add Deploy to Playstore and select the environment and the Android service. The canvas can label this job Android Deploy.

Figure 2: Deploy to Playstore job form
4.1 Artifact Selection #
Before saving the pipeline, verify how the deployment job selects the artifact to deploy. In this example, the stage definition uses the latest selector, while the execution parameters reference a numeric deployment tag. Ensure that the resolved artifact tag corresponds to the intended build to avoid deploying an unintended version.
Note: Stage order alone does not prove that the deployment uses the artifact produced by the current run.
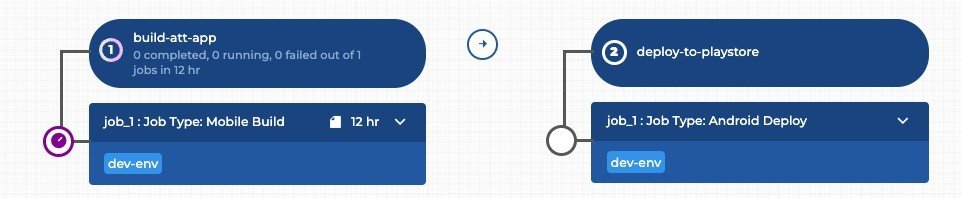
Figure 3: Pipeline canvas with the build followed by the Android deployment
5. Run and Verify #
- 1
Open Pipeline Overview and click Run with Parameters for the pipeline.
- 2
Review the service, environment, branch, artifact tag and any other execution parameters shown.
- 3
Start the run and monitor the pipeline canvas and the job details.
- 4
Confirm that the build stage succeeded and published its artifact before you accept the deployment result.
- 5
Confirm that the deployment stage succeeded, and verify the version and the track in Play Console.
Expected result: Both stages complete successfully for the intended service and environment.