

Canary Analysis Template #
A Canary Analysis Template defines how BuildPiper evaluates a canary release before it is promoted to production. It groups the metrics to be checked and sets the success criteria. BuildPiper then compares the performance and stability of the new version (the canary) with the version that is currently running (the baseline).
The metrics used in the template come from a Stability Matrix Group, which reads from a monitoring source. Set these up before you create the template. For details, see Stability Matrix and Monitoring Source.
Mapping Canary Analysis Template #
A canary analysis template is used for
Grouping all metrics which will be used to analyse the success of canary deployment
For every metric the corresponding success rate, metric threshold and metric weight can be defined
In case of more than one metric, you can define if all/any metric needs to necessarily pass for the canary analysis to pass. It is also possible to define success based on success rate.
This is how it works:
First Step:
Add a Metric to Canary Template and define metric evaluation criteria.
Select Monitoring Source -> Select Metric Group -> Select Metric
For the selected metric define metric weight. This will play a role in deciding the overall success/failure of canary analysis. Critical metrics can be assigned a higher weight (e.g., 10) to give them full preference in the final evaluation, while less critical metrics can be assigned a lower weight (e.g., 5) so they have a reduced impact on the final outcome. Value for Metric weight can range from 1-10. More about the use of Metric weight will be explained when explaining the over all success/failure calculation of canary analysis.
A Canary Analysis Template allows you to define and standardise how new application updates are tested before being fully rolled out to production. It centralises your stability metrix groups and evaluation logic, helping in comparing the performance and stability of a new version (“canary”) against the existing version automatically.
| Configuration Field | Mandatory | Description / Permitted Values |
|---|---|---|
| Template Name | Yes | A unique identifier for the canary analysis template. |
| Decision Operator | Yes | Determines how the overall canary template evaluates success. • Options: AND, OR, SUCCESS_RATE AND: Considers all metrics mapped for canary analysis. All metrics must return a SUCCESS status for the canary deployment to be marked as PASS. OR: Marks the canary deployment as PASS if any single mapped metric falls within the specified limits. SUCCESS_RATE: Requires the user to define a success rate percentage. The canary is marked as PASS if the percentage of successfully passed metrics meets or exceeds this target (e.g., if set to 50%, at least half of the configured metrics must be in a SUCCESS state). |
| Add Metrics | Yes | The set of stability or performance metrics you want to track (e.g., error rate, latency, resource usage). Each matrix requires a name, query, and value path. |
| ↳ Metric Source | Yes | The data source monitoring the metrics. • Options: Prometheus, Mongo |
| ↳ Metric Group | Yes | Select from the pre-configured Matrix Group. |
| ↳ Metric | Yes | The specific, individual metric selected from the chosen Metric Group. |
| ↳ Metric Weight | Yes | This will play a role in deciding the overall success/failure of canary analysis. Critical metrics can be assigned a higher weight (e.g., 10) to give them full preference in the final evaluation, while less critical metrics can be assigned a lower weight (e.g., 5) so they have a reduced impact on the final outcome. Value for Metric weight can range from 1-10. More about the use of Metric weight will be explained when explaining the overall success/failure calculation of canary analysis. |
| ↳ Metric Decision Operator | Yes | During canary analysis for a metric, the metric value is sourced at a regular frequency and for a defined period. The Metric Decision Operator defines the evaluation strategy, which will decide if the metric evaluation passed/failed. Options: • AND: The metric must be evaluated as SUCCESS for every single time the data is sourced during the evaluation period to be marked as PASS. Ex: If the metric is CPU percentage, Period is 10 mins and frequency is 30 seconds. The metric data will be pulled and evaluated for 21 times. For all 21 times the CPU percentage should be below the required threshold. • OR: The metric is marked as PASS if the metric data sourced is evaluated as success for at least once during the evaluation period. Ex: If the metric is CPU percentage, Period is 10 mins and frequency is 30 seconds. The metric data will be pulled and evaluated for 21 times. The CPU percentage should be below the required threshold for at least one time. • SUCCESS_RATE: Requires the user to define a target percentage (for ex 50%). The individual metric is marked as PASS if the percentage of successful metric evaluations meets or exceeds the defined target (e.g., if set to 50%, the metric evaluation must be successful for at least half of the times the metric has been evaluated). Ex: If the metric is CPU percentage, Period is 10 mins and frequency is 30 seconds. The Success_Rate is set at 50%. The metric data will be pulled and evaluated for 21 times. The CPU percentage should be below the required threshold for at least 11 times for the metric to be evaluated as passed. |
| ↳ Master Operator | Yes | Metrics evaluation happens using two methods 1. By comparing the value of the metric for Canary Deployment Pods with value of the metric for Baseline Deployment Pods. 2. By comparing the value of the metric for Canary Deployment Pods with a predefined value provided by the user The logical rule used to compare the performance metrics between the baseline pods and the canary pods. Options: • greater than • less than • equal to • greater than equal to • less than equal to |
| ↳ Arithmetic Operator Type | Yes | There are two options for comparison 1. Define a percentage, the percentage is deviation which is allowed from the baseline. For example if the master operator is selected as less than equal to, and the percentage is defined as 50%. Then if the baseline CPU utilization is 40% in that case the max canary CPU utilization can be 60% 2. Define a value (Equal to) – in this case the canary pod metric value will be compared directly with this user defined value based on the selected option in the Master Operator. |
| ↳ Value | No | In case the Arithmetic Operator Selected is “Equal To” then the Value field appears. Define a value – in this case the canary pod metric value will be compared directly with this user defined value based on the selected option in the Master Operator. |
| Baseline Threshold percentage Critical Threshold percentage | No | If Arithmetic Operator Type is percentage: The user must define two separate variance boundaries: 1. Baseline Threshold percentage: the percentage is deviation which is allowed from the baseline. For example if the master operator is selected as less than equal to, and the percentage is defined as 50%. Then if the baseline CPU utilization is 40% in that case the max canary CPU utilization can be 60% 2. Critical Threshold percentage: It is the percentage deviation from the baseline which is considered as red line. If any metric crosses this threshold then the canary analysis will fail immediately and recommends rollback. For ex: If Critical threshold is set to 200% and the baseline CPU utilization is at 40%, if canary CPU utilization crosses 120% then the canary analysis will fail immediately. |
Navigating to Canary Analysis Templates #
To create a canary analysis template, open the Canary Analysis Templates page in the User Portal. The page lists the existing templates with their Stability Group and Metrics.

Figure 1: Navigating to Canary Analysis Templates
- 1
Click your profile and select User Portal.
- 2
In the left navigation, click Templates.
- 3
Choose Canary Analysis Template.
- 4
Click + ADD CANARY TEMPLATE.
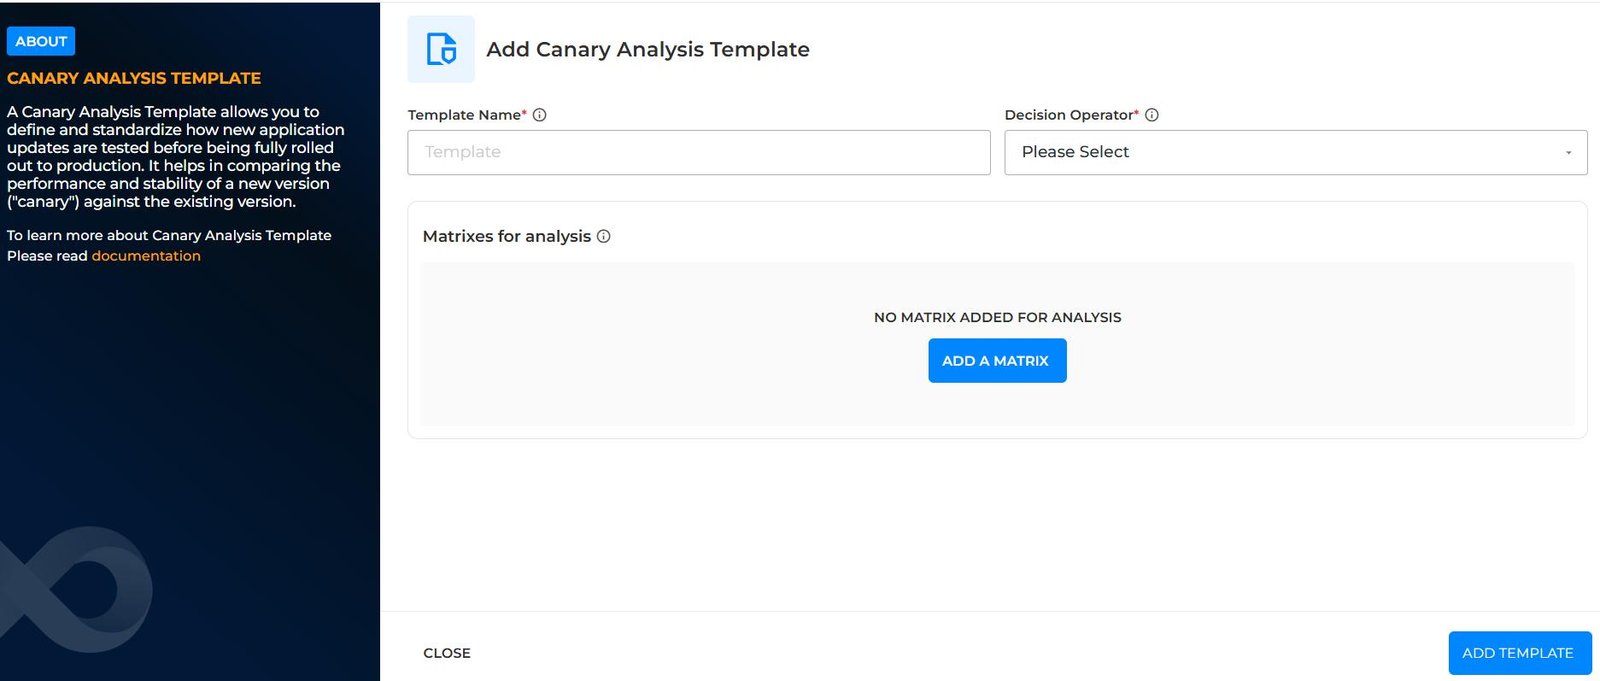
Figure 2: Add Canary Analysis Template
- 1
Enter the Template Name.
- 2
Select the Decision Operator.
- 3
Click ADD A MATRIX to add the metrics for analysis.
- 4
Click ADD TEMPLATE.
When you click ADD A MATRIX, the Add Matrix for analysis form opens. Select the metric source, group and metric, then set the weight, decision operator and thresholds. The fields are described in the table in Mapping Canary Analysis Template above. Click ADD MATRIX to save.
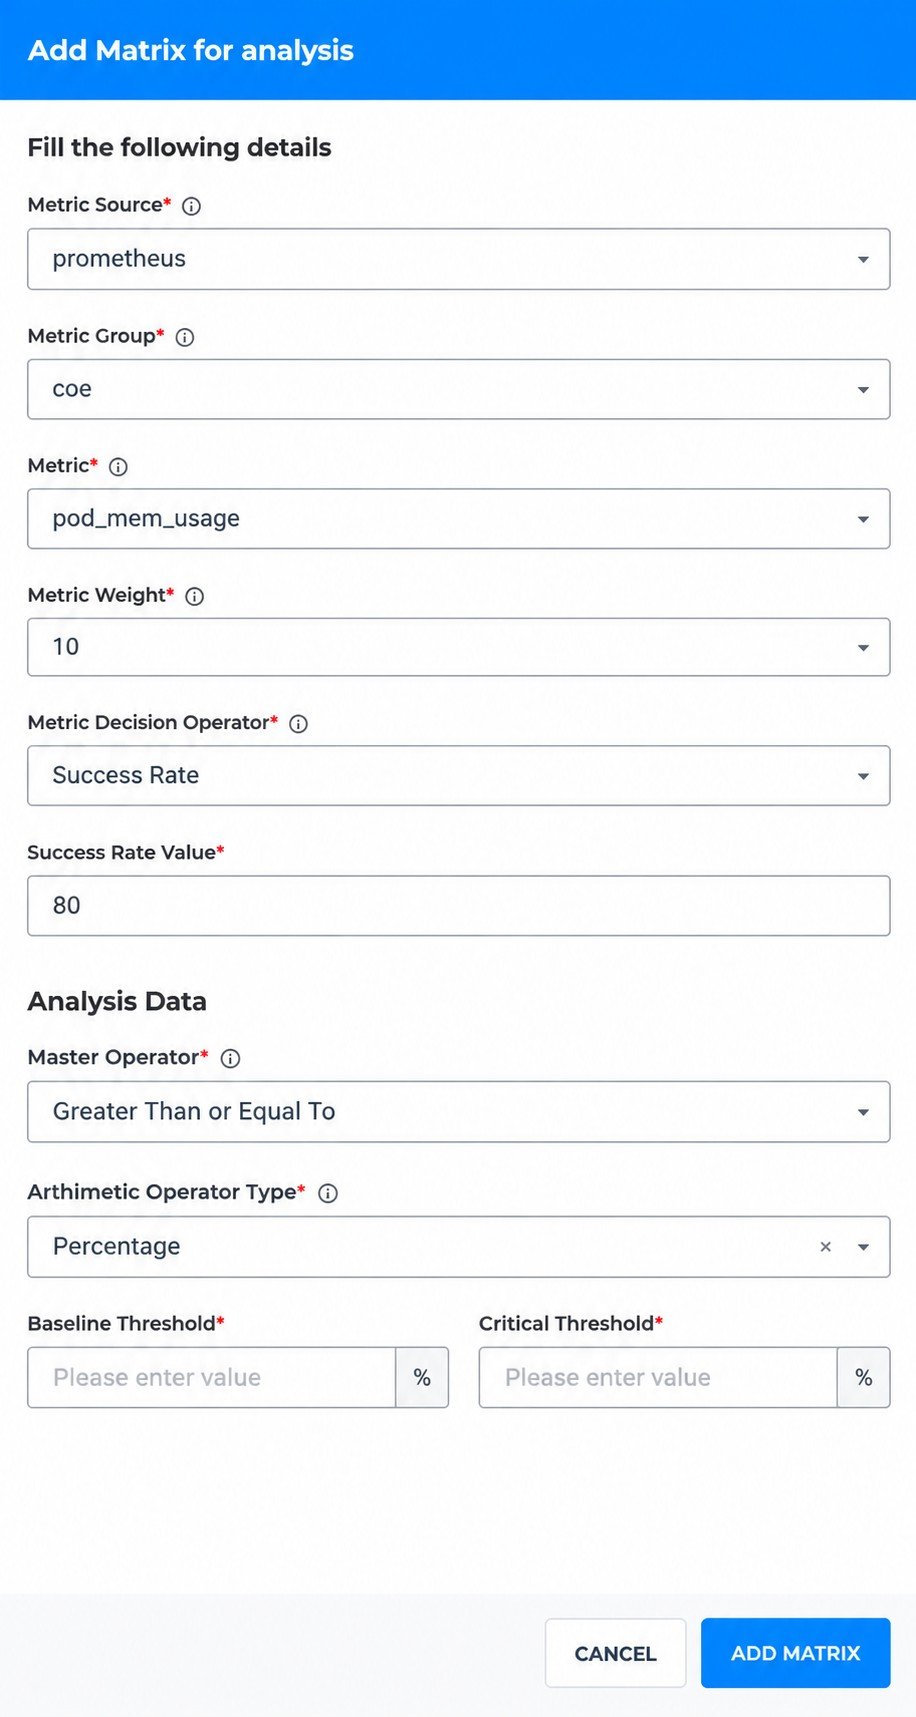
Figure 3: Add Matrix for analysis
After you click ADD TEMPLATE, the new template is created and appears in the list on the Canary Analysis Templates page, with its Stability Group and metrics.
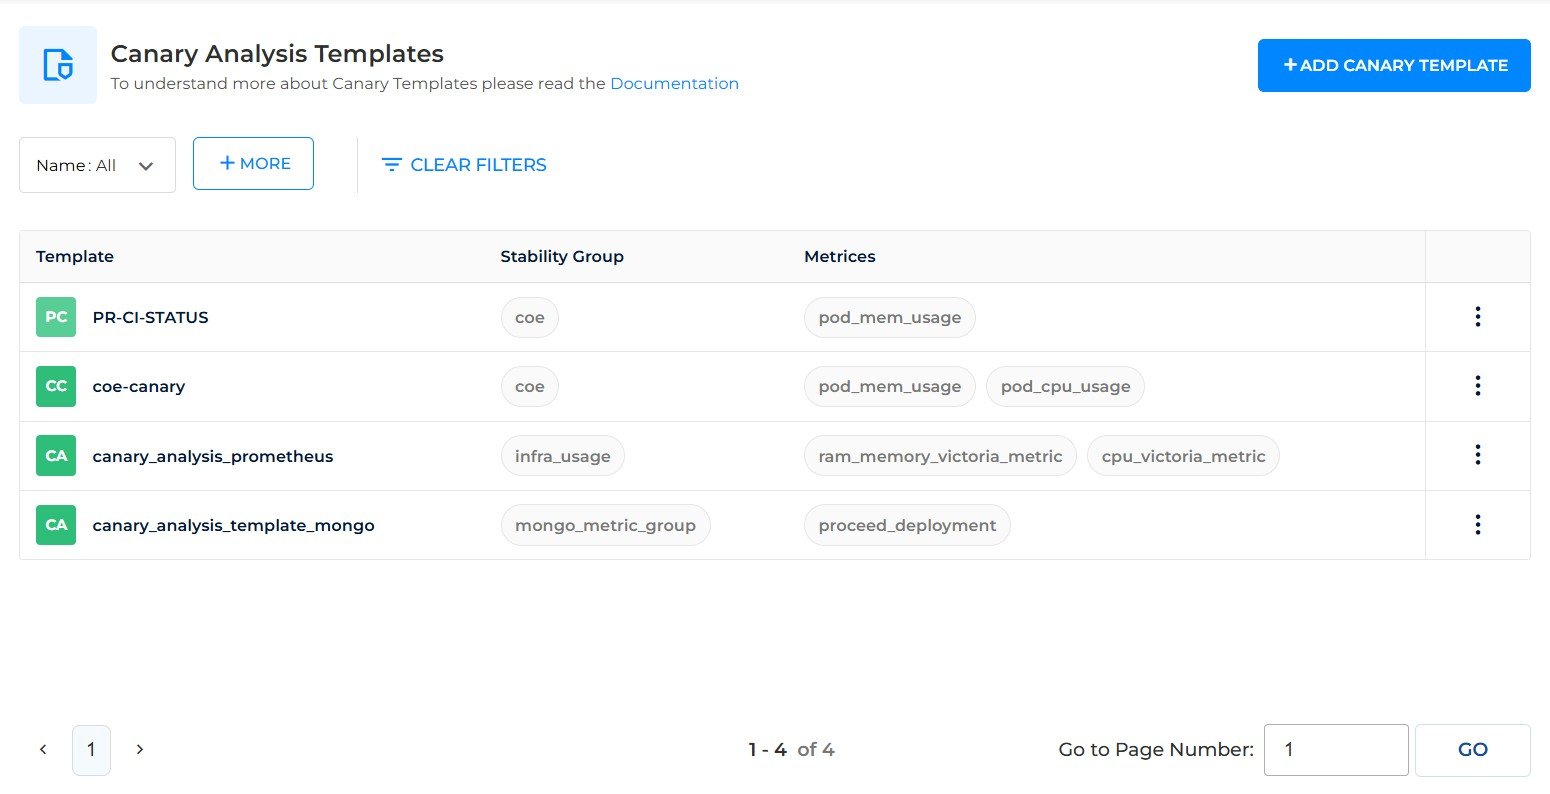
Figure 4: Canary analysis template created
Adding a Canary Analysis Template to Job Templates for automated canary analysis #
Once the analysis template is configured. Go to the job template and validate if the canary analysis Job exists in the template that you are using.
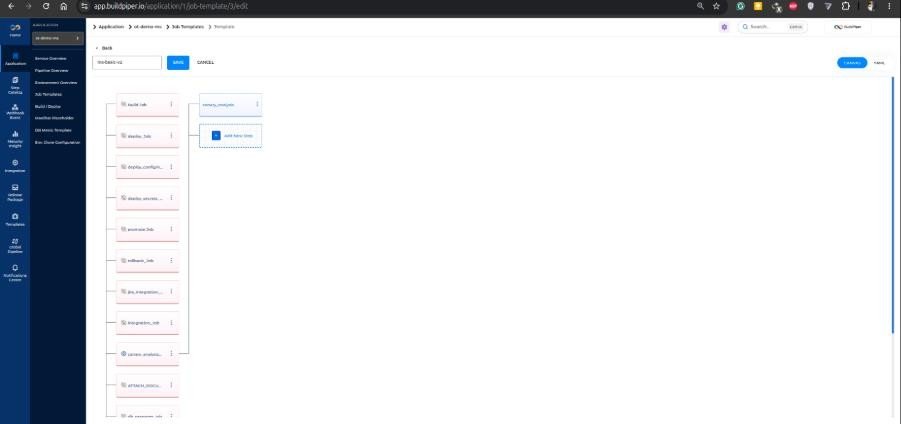
Figure 5: Canary analysis job in the Job Template
The canary analysis job of the template is used in the canary pipeline. To configure the pipeline, see Canary Setup and Pipeline.
Adding the Canary Analysis Job to a Pipeline #
When you add a job to a pipeline and select Canary Analysis as the Job Type, you must also select the Canary Analysis Template that BuildPiper uses to evaluate the canary. To learn how to add a job to a pipeline, see Pipeline Configuration.
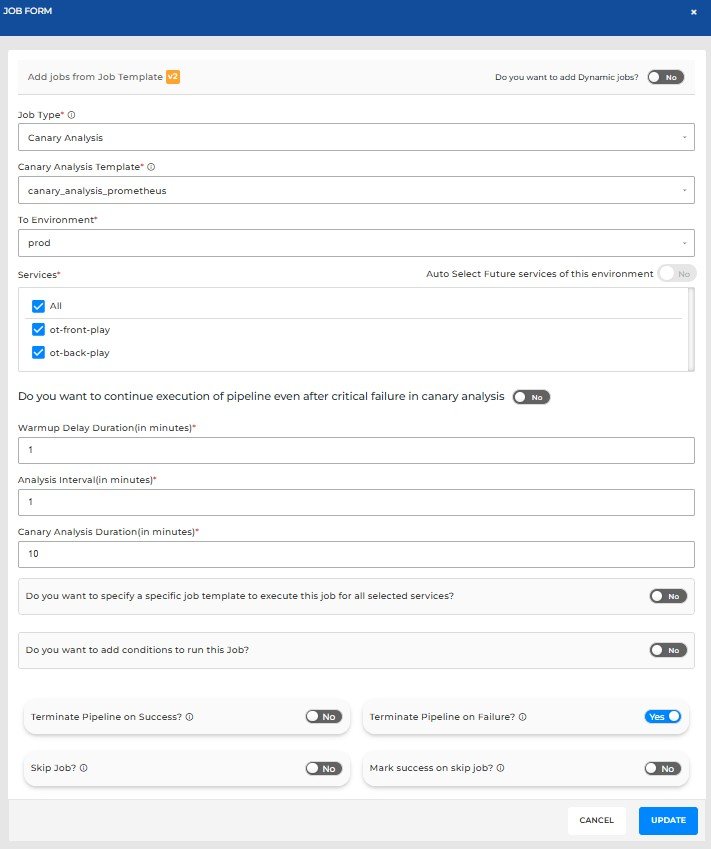
Figure 6: Job Form with the Canary Analysis job type
- 1
Add a job to the pipeline. The Job Form opens.
- 2
Select Canary Analysis as the Job Type.
- 3
Select the Canary Analysis Template.
- 4
Select the To Environment and the Services.
- 5
Enter the Warmup Delay Duration, Analysis Interval and Canary Analysis Duration (in minutes).
- 6
Click UPDATE.
Related Documents #
For more information, refer to the following documents.
| Document | What It Covers |
|---|---|
| Canary Deployment | Concept, pod shift rollout and canary analysis overview |
| Canary Setup and Pipeline | System settings, canary pipeline and job configuration |
| Canary Approval and Rollback | Failed analysis, Exceptional Approval and canary rollback |
| Monitoring Source | Adding a metrics endpoint as a monitoring source |
| Stability Matrix | Stability metrics and Stability Matrix Group |
| Deployment Strategies | Overview of deployment strategies and the job form |