

Application Configuration #
Application configuration prepares everything the Android workflow needs before you create a service: artifact storage, the application, repository access, credentials and an environment. Complete the sections in the order shown below.
| Section | Task | Portal |
|---|---|---|
| 2 | Configure the MinIO Artifactory | Super Admin |
| 3 | Create the Application | Super Admin |
| 4 | Onboard the Source Repository | User |
| 5 | Add the Android Signing Credential | User |
| 6 | Add the Play Store JSON Credential (only for Google Play deployment) | User |
| 7 | Create the Application Environment | User |
1. Configuration Levels #
BuildPiper manages Android configuration at two levels. BuildPiper environment construct has two levels. At team level multiple environments of type Dev, QA, UAT and Prod can be created. For example: blue1-dev, qa-2 etc. All generic configurations related to the Mobile app deployment are captured at this level. Then for every mobile app service – we can define the Build configuration and push to play store configuration for every environment at the service/app level.
| Level | What it manages |
|---|---|
| Application Environment | The shared environment resources and integrations, such as artifact storage and credentials. |
| Service Environment | Once service linked to an Application Environment, it manages the service-specific mappings and configuration. |
2. Configure the Artifactory #
The Artifactory stores the Android build artifacts. This task is performed in the Super Admin portal.
2.1 Open the Artifactory Page #
- 1
Click your profile at the bottom of the left menu and select Switch to Admin Portal.
- 2
Click Integration in the left menu.
- 3
Click Artifactory to open the Artifactory listing.
- 4
Click + ADD ARTIFACTORY at the top right of the page.

Figure 1: Navigating to the Artifactory page
2.2 Add the Artifactory #
BuildPiper supports MinIO, Nexus, and Amazon S3 as artifact storage options. In this guide, MinIO is used as an example. Select MinIO in the Create Artifactory form to follow the steps demonstrated in this workflow.
- 1
Enter the Artifactory connection details described in the table below.
- 2
Click Create.
- 3
Open the Artifactory listing.
- 4
Click Test for the integration and confirm that its status is Connected.

Figure 2: MinIO Artifactory connection fields
| Field | What to enter |
|---|---|
| Name | A clear integration name that users can recognise when they configure an environment. |
| Url | The MinIO endpoint that BuildPiper can access. |
| Access Key | The MinIO access key. |
| Access Key Credential | The credential that is associated with the access key. |
| Bucket Name | The bucket that stores the Android build artifacts. |
Expected result: The MinIO integration is available for selection and its connection test succeeds. Confirm that the bucket exists and that the credentials allow the artifact operations that the workflow needs.
3. Create the Application #
This task is performed in the Super Admin portal. Navigation: Manage Application → Apps Summary → Add Application.
- 1
Fill in the Add Application form. For Android, enter the Application Name, Application Description and Policy Template. Select a job template and its version only if your setup requires an explicit selection.
- 2
Click Add Application.
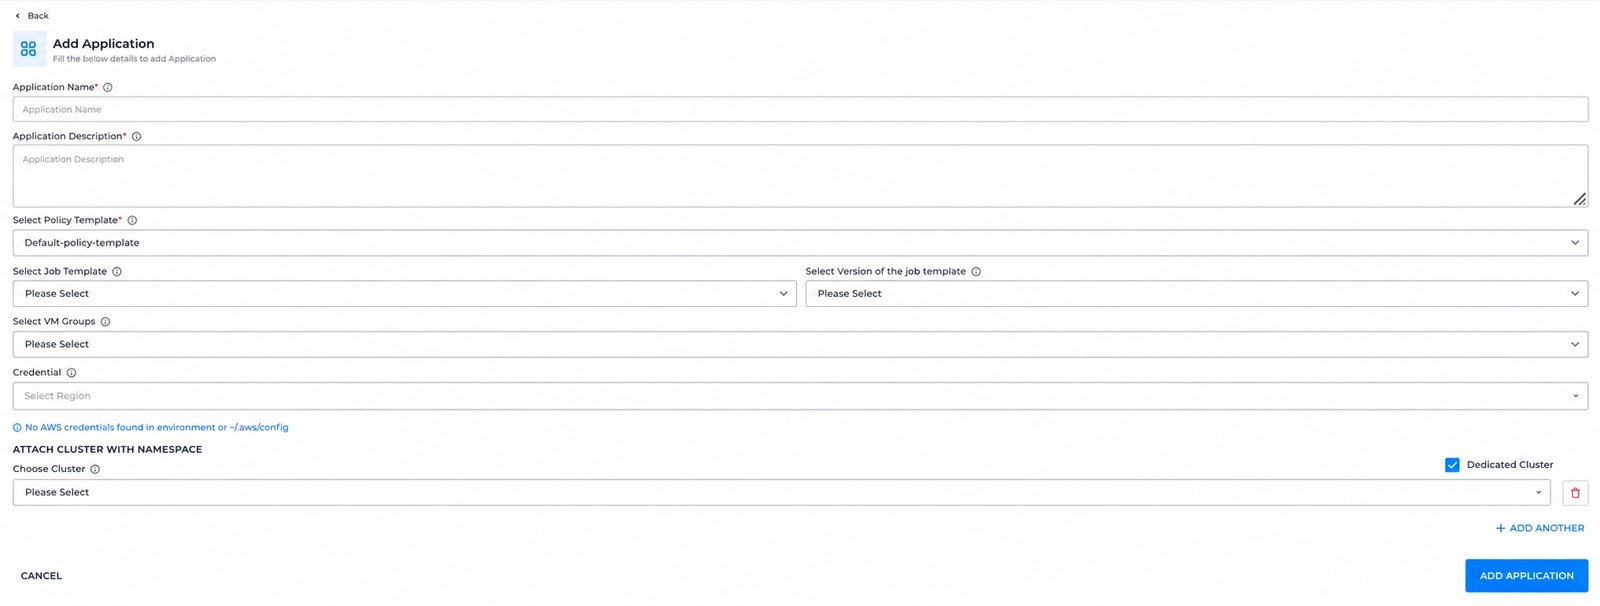
Figure 3: Add Application form
The form also shows VM group, credential, region and cluster fields. They are not required for Android build and Play Store deployment. Configure them only for the other service types that the application contains, such as Microservice, Cron, VM or iOS.
Application creation also generates application-specific job templates, including the mobile job template, which is typically named [application_name]_mobile-v2.
Read more: Application Configuration (description of every field of the Add Application form)
Mobile Workload Job Templates
4. Onboard the Source Repository #
This task is performed in the User portal. BuildPiper supports GitHub, GitLab and Bitbucket repository integrations.
4.1 Open the Repository Page #
- 1
Click Integration in the left menu.
- 2
Click Repo Integration to open the Code Repositories page.
- 3
Click + ADD REPO at the top right of the page.
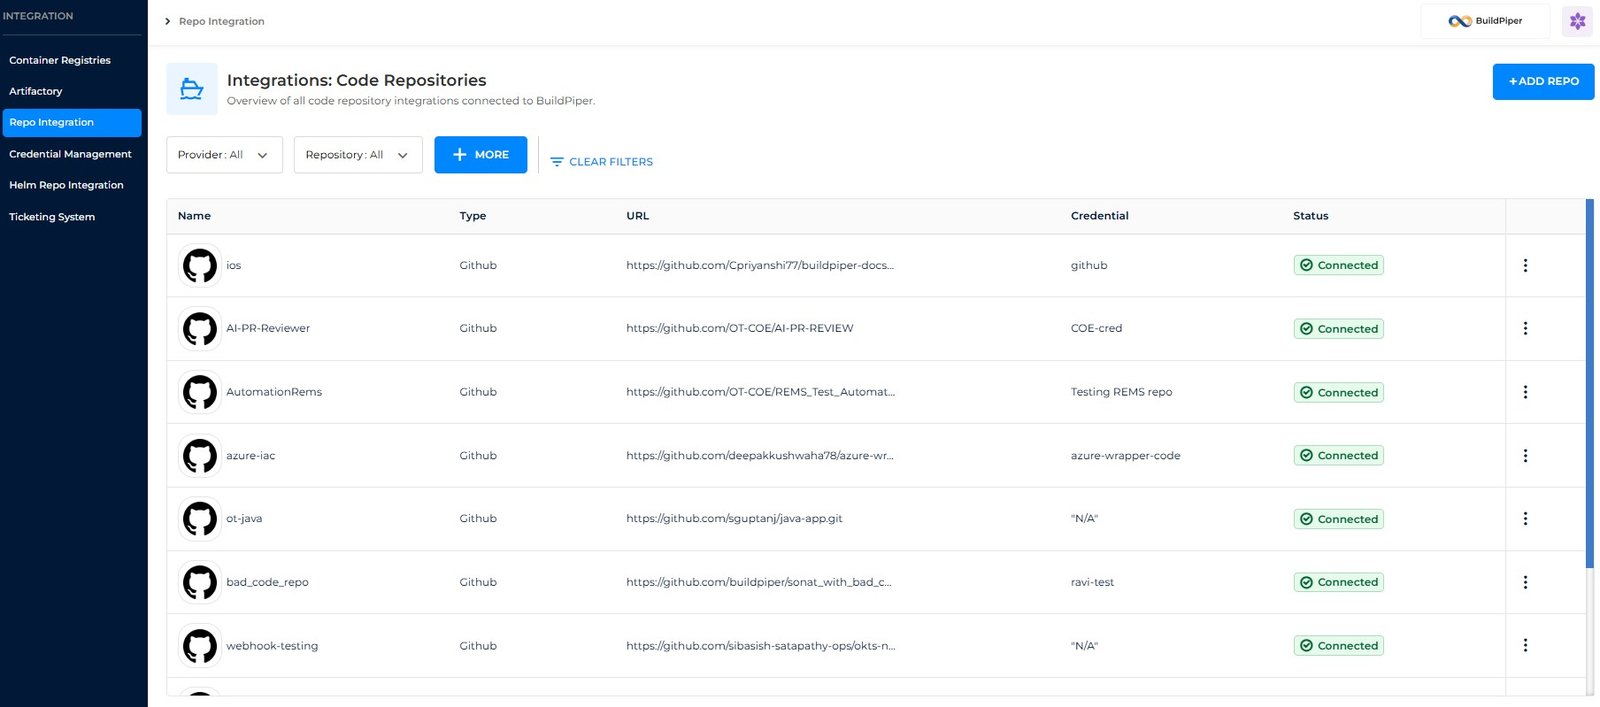
Figure 4: Code Repositories page
4.2 Add the Repository #
- 1
Click Add Repo and select the repository provider.
- 2
Enter the Repo Name and the repository Url.
- 3
Click Select Credential. Use New Credential if the repository credential does not exist yet.
- 4
Click Test Connection and confirm Connection Established.
- 5
Select the user groups that need View Permissions and Write Permissions.
- 6
Click Save and confirm that the repository appears as Connected in the listing.

Figure 5: Repository connection and group permissions
The screenshot shows GitHub onboarding. For GitLab, select GitLab from Add Repo and complete its provider-specific fields.
Expected result: The repository is connected and available when you configure App Packaging. If it is missing from the Git URL selector, check the integration and the group access of the user.
Note: Repository onboarding needs its own repository-access credential. The Play Store JSON credential and the Android signing credential serve different purposes and do not replace it.
5. Add the Android Signing Credential #
This task is performed in the User portal. The Android workflow uses two credential types, the signing credential and the Play Store JSON credential. Both are added from the Credential Management page.
5.1 Open the Credential Page #
- 1
Click Integration in the left menu.
- 2
Click Credential Management to open the Credentials page.
- 3
Click + ADD CREDENTIAL at the top right of the page. The Add Credential form opens.

Figure 6: Credential Management page
5.2 Add the Signing Credential #
The App Signing Config defines how your Android app is digitally signed before it is built and released. Every Android app must be signed with a unique digital certificate (key) before it can be installed on a device or uploaded to the Play Store.
- 1
Select App Signing Config.
- 2
Enter a unique Credential Name.
- 3
Upload the Android keystore file.
- 4
Enter the keystore password.
- 5
Click Fetch Keystore Keys to retrieve the available keys.
- 6
Complete any key-specific inputs that the form shows and confirm that the required alias is available.
- 7
Select the user groups for View Permissions and Write Permissions.
- 8
Click Save and confirm that the credential appears in the credential listing.

Figure 7: Signing credential keystore and permission fields
Expected result: The signing credential can be selected when you configure the Application Environment, and the key alias is available for the Android workflow.
Note: Use the keystore and alias that are accepted for updates to the intended app. For an app that uses Play App Signing, confirm that the selected upload certificate matches the upload certificate registered for the app. If Fetch Keystore Keys does not return the expected alias, check the uploaded file and the keystore password before you continue.
6. Add the Play Store JSON Credential #
Note: Complete this section only if you want to deploy to Google Play. For a build-only workflow, skip it.
6.1 Prepare Google Play Access #
| Item | What to do |
|---|---|
| Google Play Developer API | Enable the API in a Google Cloud project and give the service account the required access to the app in Play Console. A valid JSON key alone does not give the service account permission to publish an app. |
| Package name | Confirm the package name of the app in Play Console. The App Package Name configured in BuildPiper must match the Android application ID of the artifact and the Play Console app. |
| Signing key | Use the signing key that the app accepts. With Play App Signing, the key used for uploads can be different from the key Google uses for distribution. |
6.2 Add the Credential #
This task is performed in the User portal. Open the Add Credential form as described in section 5.1, and then follow the steps below.
- 1
Select JSON Cred.
- 2
Enter a unique Credential Name, for example android-playstore-publisher.
- 3
Paste the service account JSON in JSON Credential.
- 4
Select the user groups for View Permissions and Write Permissions.
- 5
Click Save and confirm that the credential appears in the credential listing.

Figure 8: Play Store JSON credential and permission fields
Expected result: The credential is available in Select Playstore Credentials when you configure the Application Environment.
Note: Store the JSON credential and the keystore only through Credential Management, with access limited to the groups that need them. Do not paste private keys or passwords into build commands, source code or shared documentation.
7. Create the Application Environment #
This task is performed in the User portal. Navigation: Application → select the application → Environment Overview → Add Env. You can also open the form directly with the route /application/{application_id}/env/add, replacing {application_id} with your application ID.
- 1
Select the environment type: DEV, QA, STAGING, UAT or PROD.
- 2
Enter an Environment Name, for example dev-env.
- 3
Set Allow Manual Build and Allow Manual Deploy according to your team workflow.
- 4
Set Enable Hyper Build as required. The Android example uses No.
- 5
To publish from this environment, enable Deploy to playstore and select the three credential fields described in the table below.
- 6
Select the MinIO Artifactory and the bucket that stores the artifacts.
- 7
Complete any other fields that the form requires and click Save Changes.
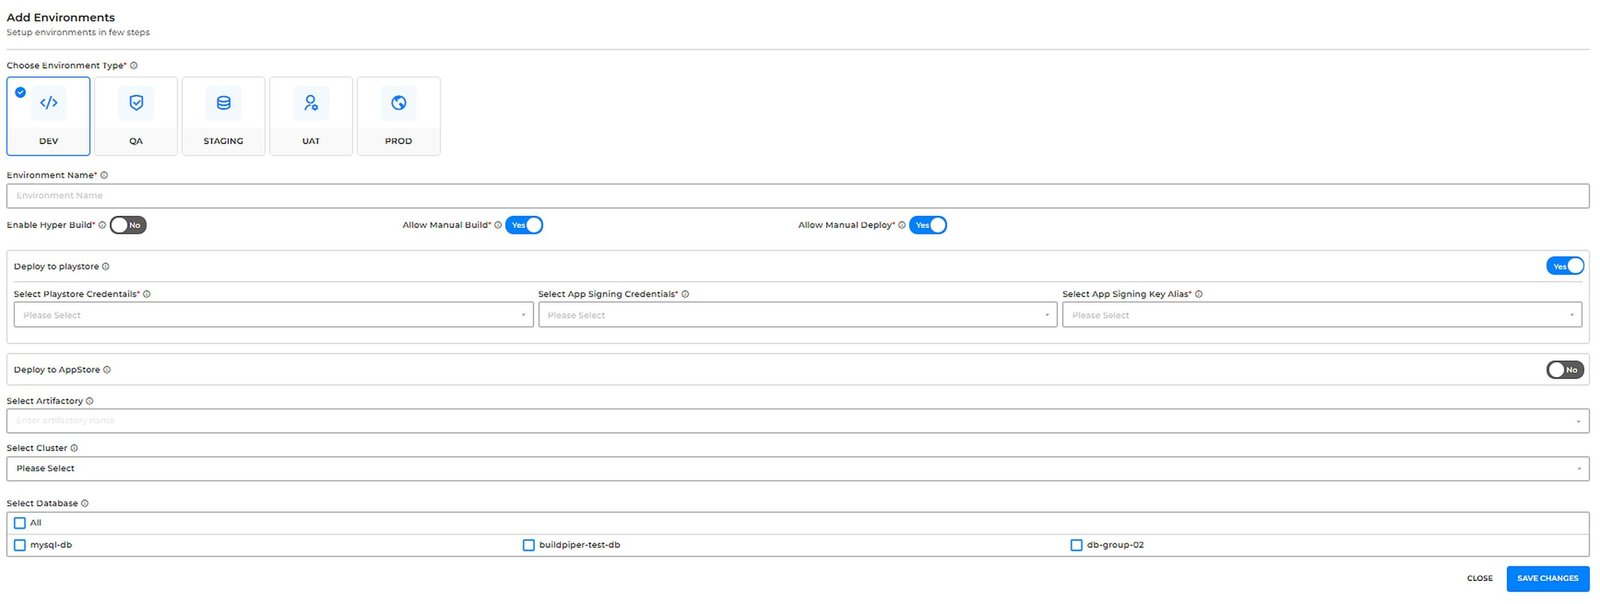
Figure 9: Environment settings and Play Store credential selection
When Deploy to playstore is enabled, the following fields are required.
| Field | Required | What to select |
|---|---|---|
| Select Playstore Credentials | Yes | The Google Play Console credential (the service account JSON added in section 6) that BuildPiper uses to authenticate with Google Play and upload your application builds for distribution. |
| Select App Signing Credentials | Yes | The App Signing Config that contains the keystore used to digitally sign the Android application before it is uploaded to the Google Play Store. |
| Select App Signing Key Alias | Yes | The key alias from the selected keystore that signs the application. The alias must correspond to the signing key that is registered for the application in the Google Play Console. |
Expected result: The environment appears in Environment Overview, with its artifact storage and deployment integrations ready for a service to use.
Note: Leave Deploy to playstore disabled if the environment only builds and stores artifacts. Signing can still be needed, depending on the type of artifact you distribute.